Introduction
Welcome back to the series! In Part One and Two we discussed RBA object selection tailored to AWS identities and how to assign the numerical risk values to those objects using SPL. We also looked at basic examples of how those base scores could stack up for various objects to cross a defined threshold. All that was necessary to get us here: "variable scoring". We will explore some ideas to get you on your way with variable scoring in the skies of AWS. I want to stress again that this approach is derived from work I've done in my own time using Splunk but it applies to other SIEM offerings and can be built using common programming languages like Python (which is a future project of mine). Anyway, let's get right into it:
Variable Scoring
Before we get too far, it may be helpful to define "variable scoring." Think of variable scoring like the thermostat in your home. The base score is the default temperature setting, providing a nice baseline. When certain conditions change—like a snow storm (a high-risk event) or an unusually warm day (a known benign event)—the thermostat adjusts, either raising or lowering the temperature to maintain balance. Similarly, in variable scoring, when important context and interesting metadata is detected, the score can increase, signaling higher risk. In less critical situations, like routine activities, the score decreases, much like lowering the thermostat when the outside temperature is mild. Just as adjusting a thermostat keeps the peace in your house, variable scoring helps you right-size a detection event.
In other words, this is where you create logic that is tailored to use-cases that are important to you and modify the intended base_score in either direction (+/-).
In Part Two, our detections would have a base_score derived from the severity of the alert, such as 40 points for the Low severity category. Everything mentioned below in this blog is what happens AFTER the base_score is defined but BEFORE the final risk_score is calculated. For the purposes of this blog (and your sanity),
I've set the target threshold at 100. It is very easy to get carried away with variable scoring but keeping your threshold in mind when selecting a given score or set of scores is crucial. Remember, you will need to master the basics before getting too fancy. At a minimum you would set the base_score (increasing or decreasing) based on your own severity scores or by using
Splunk's preferred ranges. That said, the modifiers below will adjust this base_score and sometimes the use-cases themselves may have dynamic scores depending on the context.
Scoring Modifiers
Before we dive into the modifiers that make up this proposed scoring engine, I want to pause and point out this
awesome blog by the folks over at Wiz. The timing of this blog could not be better, as I have long held similar opinions on this topic. It's such a pivotal concept to understand before attempting to integrate IOCs into your scoring engine. Amitai Cohen & Merav Bar eloquently explain the overlap but key differences in traditional versus cloud-specific IOCs. I believe those in the Cloud TDR or Cloud Security space understand this point, but while traditional IOCs have value in the cloud, they are often simple indicators rather the actual IOCs in practice. We have to think differently and perhaps reimagine the
Pyramid of Pain and how to apply it to the cloud. However, we will not be doing that here, and it is more food for thought before we lead into some of the modifiers below.
I will do my best to provide shell SPL code that can get you started, but in some cases, I would be selling short the prerequisites for implementing but in these cases I will simply provide pseudo-code. So let's start building this scoring engine.
Target Resources of Interest - TI Watchlist (+5-25)
Our first modifier requires you or your Threat Intelligence team to curate a list of AWS cloud-native IOCs that ideally is focused on intel collected on the threat actors (TAs) that target companies like yours and comprise your "Most Wanted List". This list would exist in the form of a lookup or KV store and should be updated in an automated fashion. The IOC collection and review should be vetted by you and/or your threat intel team, so there is some manual work, but again, automate as much of this as possible. It will also be necessary to tag each of the IOCs with its respective value type (see some examples in the
referenced blog above).
This KV store would have things like AWS Account IDs used by a TA on your Most Wanted List. Or perhaps the naming conventions of identities and/or resources created by the TA or the tool(s) they used. Simple often wins, so being able to match an AWS account ID within an updated
AssumeRolePolicy or the target_resource_arn of an externally shared resource (like a
shared RDS snapshot). The same could be applied to IAM User/Role friendly names. For the logic to work, you'd need to run your lookup against the applicable risk_object(s) from your detection output as discussed in Part One for the best coverage.
By now, it's probably obvious that matches against this type of threat intel is likely worth scores ranging from 5 to 25+, depending on the fidelity rating of the IOC. I will leave it up to you to choose, but an example score for an AWS Account ID match would likely be on the higher end of your range. This is because the likelihood an attacker's AWS account has more than one resource in it is moderate-high and even more likely that it is being used launch attacks against more than just your company. For these reasons, it's plausible to say that an IOC like an Account ID is a valuable cloud-native IOC and should be scored appropriately.
Target Resources of Interest - Tier 0 (+5)
Hopefully, you're at a point in your maturity journey where you know what your Tier 0 resources are in AWS. But even if you don't, there is always a place to start. Assuming you're using a standard naming scheme for your important resources (databases, S3 buckets, etc.), you can simply use regex matches for these conventions. If you've been on this journey for a little while and you have an inventory that can be used in your detection engineering to query (real-time or otherwise) and obtain the tags identifying your Tier 0 resources, this process becomes much easier.
The idea is to know when something is detected involving one of your most important assets. This is concept isn't exclusive to clouds like AWS, but remember, the attack surface is always bigger than you think, so it's good to "be in the know."
| lookup tier_0_assets resource_name as target_resource_name output tag
| eval tier_0_target_resource=IF(tag="tier_0", 5, 0)
IP Address Enrichments - VPN/Proxy Hits (+5-15)
At the risk of sounding like a flaming hypocrite, I believe there is value in the IP addresses that may arise during an AWS investigation—not always in the IP itself, but in the enriched metadata that can be correlated with
VPN,
VPS,
residential proxies or other anonymizing/proxy services.
If you have an API token and license for any of the IP address/domain enrichment services out there, this can be a game-changer for the context it provides IR analysts but also Detection Engineers. One of my favorite services in this space is
Spur, but no matter which one you use, the point is to focus on your Most Wanted TAs and their tendencies. If you know your TA likes to use Nord VPN and you are confident this doesn't conflict with your user base (and I will be praying for you if that is the case), then this makes for a good score modifier. If you do not have access to this type of enrichment and have to settle for simpler/more affordable solutions, geolocation and/or ASNs, there is some value here but stay true to the intel. In this case, I would put the score on the lower end of the range.
| ip_enrichment_app field="src_ip"
| eval suspect_ip_mod=IF(match(most_wanted_vpn_proxy, ip_enriched_vpn), 10, 0)
In the above eval command, the src_ip was enriched with and output the field, ip_enrich_vpn and contains the value, "nord_vpn" which just so happens to match the VPN our Most Wanted TA uses, as noted above. In this example, the most_wanted_vpn_proxy field would've come from a lookup that you (or your Threat Intel team) maintains and tracks metadata like proxies used by your best friends.
Users of Interest (+1)
This is also not necessarily cloud specific however, it's about knowing who your TAs would target within your organization to pivot into your AWS cloud environment. This generally includes your global administrators, IAM team and/or your Cybersecurity team. This is a small score modifier since these people will naturally trigger detections during operational work, but it's about the collective score—every little bit helps.
| lookup all_your_identities user output department
| eval user_of_interest_mod=IF(match(department, "(?i)identity_access_management|cyber|platform"), 1 , 0)
AWS Identities of Interest - Privileged (+1-5)
Assuming you have an inventory of your AWS IAM identities and can be used in a lookup, this should be easy. If not, you may be able to fall back to your naming convention for privileged identities. Similar to your Tier 0 resources, your Tier 0 AWS identities are critical to track across your detection events. I'd recommend reserving the higher end of this score range to be for your "break glass" identities, global admins and/or Tier 0 tagged identities. Other generally privileged identities can be scored at the lower end of this range.
| lookup tier_0_identities resource_arn as aws_identity_arn output tag
| eval aws_identity_priv_mod=case(match(aws_identity_arn, "(?i)break_glass_role|global_admin_role") OR tag="tier_0", 5, match(aws_identity_arn, "(?i)admin_role") OR tag="privileged" , 1, true(), 0)
The eval command above uses a case function which that matches on the first true condition. This ensures that Tier 0 identities receive the higher score, while other privileged identities are assigned a lower score.
AWS Identities of Interest - External Access (+5)
This modifier is near and dear to my heart. And that is simply because...I do not trust any vendor that can reach into my environment—even if they were paid to do so. "Keep your friends close and your...", well I won't go that far but you get my point. All jokes aside, it's important to pay close attention to any identity that can AssumeRole into your AWS environment. Hopefully you keep track of these ARNs and even better if you are aware of which services and APIs those identities are expected to use. I would leave the higher end of this scoring range to vendor roles that can modify resources and the mid-lower end for your less privileged or read-only roles.
| lookup tier_0_identities resource_arn as aws_identity_arn output tag
| eval aws_identity_ext_mod=case(tag="external_access" AND tag="privileged", 5, tag="external_access" AND tag="read_only", 3,tag="external_access", 1, true(), 0)
User Agents of Interest (+5-10)
I know some of you reading this just 🙄, but hear me out. This is a very select group of user agent (UA) strings that cover tooling that is anomalous in your environment or ones you're confident would be evil:
Pacu isn't on this list due to its feature that
randomizes the user agent string which was meant to bypass AWS GuardDuty... nice touch. The rest, however, are easy, low-hanging fruit. Don't give your threat actor
too much credit—they're often just as lazy as we are. This list is obviously not all-inclusive, but beyond similar AWS attack tools, you'd need to be very confident that their prevalence is low or non-existent in your environment before adding them to your scoring engine... so proceed with caution here.
Additionally, you should make exceptions for your internal red team/security team who may be using these tools to improve your AWS security posture.
| eval sus_user_agent_mod=case(match(user_agent,"(?i)kali(\d+-|.\d+)|cloudfox"), 10, match(user_agent,"(?i)S3 Browser|Scout Suite"), 5, true(), 0)
Honorable Mention
There are so many more modifiers that can come into play, but to avoid writing a novel, I've limited it to seven examples that add to the score. This cuts both ways, and there are several negative and/or "safety net" modifiers that can be implemented to maintain balance when needed. Since you made it this far into the blog, here are a few additional modifiers below 😉:
Newly Provisioned AWS Accounts (-10)
There are a set of actions that need to occur within newly provisioned accounts just to get things in order, which may trigger well-meaning detections. I would keep track of these account IDs and their creation date so you can use this data as a risk adjuster. This should be time-bound to whatever you feel comfortable with, perhaps up to 3 to 7 days.
| lookup master_aws_account_list.csv aws_account_id as aws_account_id output created_date as created_date_epoch
| eval one_week_epoch=now() - 604800
| eval new_account_mod=IF(one_week_epoch < created_date_epoch, -10, 0)
Noisy Adjuster (1*)
Sometimes the benefit of "informational" detections is just that, they can provide some good context in telling the bigger picture. In order to keep these detections from needlessly crossing your risk threshold, this select list of detections can get a score adjustment to set their base_value to 1. Trust me, if you ingest vendor informational detections and you want to leverage them in your risk-based alerting, this will come in handy (thank me later).
| eventstats dc(aws_account_id) as dc_account_ids by target_resource_name detection_name
| eval base_risk_score=IF(detection_name="AWS Privileged IAM Role" AND dc_account_ids > 25, 1, base_risk_score)
I'm only providing one example here, as this can easily become dozens of lines of code depending on your bucket of "informational" detections that fit the above description. In this example, picture your platform team deploying a privileged role out to every AWS account in your environment or even subsets (only non-production accounts). The above code simply gets a distinct count of AWS account IDs that showed up for the same target_resource_name (friendly role name) by detection name. If this count is over 25 (adjust to whatever is appropriate for you), we will change the base risk score to 1. So this is technically a modifier but instead of using subtraction, we are overriding the base_risk_score altogether.
Again, the point is that you still want these detections to count toward the score accumulation for a given risk object, but you don't want unnecessary score inflation. You could also do something like: IF(detection_name="vendor_rule_here" AND severity="informational", 1, base_risk_score)—but that's only if you really have trust issues... just kidding.
See it in action
Go through Part One's threat scenario for a refresher, but this time we'll be applying variable scoring. Let's add two simple details to the scenario. When enumeration was performed after initial access, it was done using Scout Suite and every IP address used can be attributed to NordVPN services, which is used by one of your Most Wanted TAs.
Let's see how these modifiers would've impacted the time it took to reach our 100-point threshold. Note: the graphics will only apply to the risk objects that can be tracked all the way through this scenario:
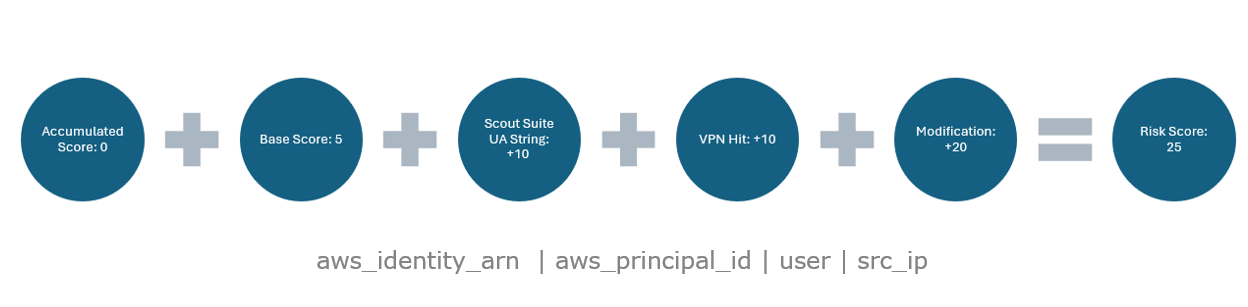
High Volume of API Errors by AWS Principal
 |
| Score Breakdown: API Errors by AWS Principal |
At this point, this affects all four risk objects selected for this detection, and the accumulated risk total is 25 points (0 + 25).
AWS GuardDuty Alert - Discovery:IAMUser/AnomalousBehavior
 |
| Score Breakdown: AWS GuardDuty Discovery |
|
Since AWS GuardDuty is missing some important identity data (aws_identity_arn), only three out of four previous risk objects will carry over the accumulated risk total and receive a risk score of 65 points.
AWS Privileged IAM Role
 |
Score Breakdown: AWS Privileged IAM Role
|
Note that several new risk objects apply to the detection use-case, some of which are crucial for continued correlation as events unfold in the environment. Also, keep in mind that the adversary has switched IP addresses, which hinders hinders the accumulation of the src_ip object score. However, due to the enrichment, it doesn't impact the modifier and we can still increase the risk score applied to each of the seven objects in this event. Of the four objects that had carry-over scores, two of them—"user" (despite my previous complaints) and "aws_principal_id" (more importantly)—each now have an accumulated 125 points.
You could argue that none of these detections, individually, are worthy of Incident Response review, but because of Risk-Based Alerting (or "Tailored Event Aggregation"), there is enough fidelity here to take immediate action. Additionally, this approach is significantly faster than the method using base scores in Part One, and this was a simplified example with only two modifiers being applied.
Lastly, even if one of the two modifiers did not trigger or even if one of the first two detections did not trigger, we are still in a good spot. This is due to the additional risk objects in the third detection, which correlate the IAM role ARN (target_resource_arn) to the aws_parent_principal_arn and allow the threshold to be reached. Combining the identity-centric approach with variable scoring, in my opinion, is what makes this so powerful. It ultimately just comes down to getting creative, knowing your own environment, and your TAs.
Tune out vs. Modifier
This is an important "North Star" to establish because you may struggle with some of these ideas when deciding between tuning out noise or implementing a negative score modifier. In my opinion, you should tune out things that serve no value and are truly false positives, as long as you are comfortable accepting the false negative risk that naturally comes with lowering false positives. If you're not fully comfortable accepting that risk, then it might be a candidate to create a negative modifier instead of tuning it out.
Here's an example: some folks may think that you should tune out certain AWS Services from detections due to implicit trust in the service (and AWS as a CSP) or the sheer volume of events. This might be a good idea in some situations (maybe), but it will likely expose you to the risk of a threat actor using a service for their own purposes. Let's return to our AWS Privileged IAM Role alert as an example. It may be normal for the CloudFormation service to appear in this detection, such as when provisioning of org-wide roles, so tuning out this service completely seems logical. I would argue that while this may improve fidelity, it will also dramatically increase your likelihood of false negatives. Are you comfortable accepting the risk of a threat actor abusing the same pipeline you use to provision resources via CloudFormation? Follow this "Tuning North Star" wherever answer it leads, but be sure to follow it.
A non-AWS but cloud-based example might be the risk of tuning out VPNs from your O365 sign-in detections because you have a mobile workforce and support BYOD. This could significant increase your false negatives, given the rampant use of VPNs among threat actors.
Conclusion
The use of variable scoring within the framework of risk-based alerting that is tailored to the identity and their attributes is one of the best aspects of this approach. It offers a powerful method for prioritizing detected threats in your AWS cloud. Understanding the significance of cloud-specific IOCs and cataloging your privileged AWS identities and assets are essential factors in this approach. Striking a balance between tuning out noise and implementing smart modifiers that capture meaningful context is key if you want to reduce time-to-detect cloud-focused adversaries. If I haven't stressed this enough, allow me to do it once more: pay attention to your Most Wanted Threat Actors... they're paying attention to you.
Before I let you go, everything mentioned above provides options for implementing variable scoring using a scoring engine, but this is not a checklist. Expand on this list or create your own. There's no real limit, as long as you remain practical and true to your North Star. Hopefully, this was helpful, and you enjoyed this mini-series on my methodology to AWS Detection Engineering.
Happy hunting!


Comments
Post a Comment